Match a Focal Image to Your Background: EZ with CZ

Hi friends! Happy Tuesday! Please join me in welcoming special monthly Guest *CZ herself*, Cathy Zielske in the latest of our EZ with CZ blog series! Be sure to watch the video to learn all the details on this ADORABLE card and enjoy!!
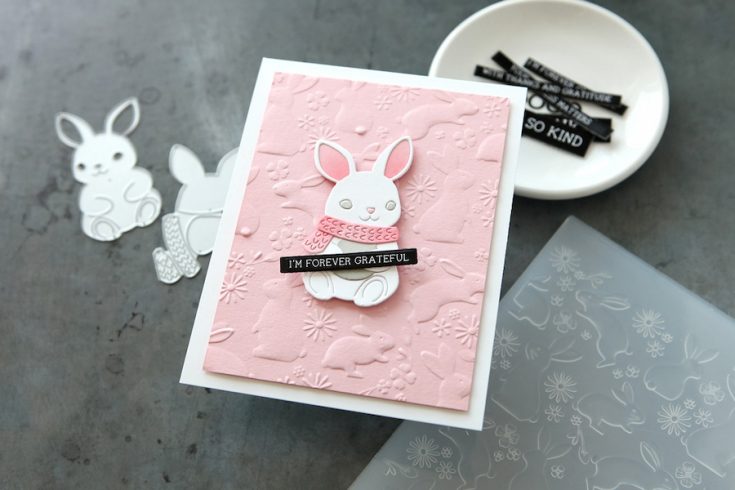
Hey everyone, it’s Cathy Z. Here and today I’m sharing a very simple card that matches the theme of my die cut to the theme of my background even though these products were not designed to go together. When you work within a theme framework, you can just look for any products that can fit the bill and get to creating.
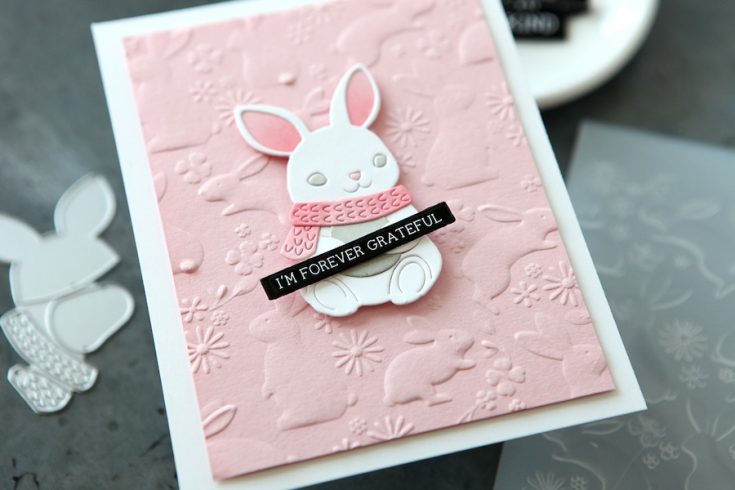
I love this Bundled Bunny Die and paired it up with the Springtime Bunnies Embossing Folder and even though they were not designed as matching products, the theme of bunnies works beautifully together. Here is my video showing how easy this card was to create:
WATCH THE VIDEO:

SUPPLIES:
|


Thanks so much for stopping by today, and thanks to CZ for being our guest!
Make Cute & Colorful Grid Cards with Small Stamps: Yippee for Yana

Hi friends! Please join me in welcoming back the oh-so-talented and amazing Yana Smakula! (Please note: our dear friend Yana is Ukrainian. To show support to our brothers and sisters in Ukraine, please see Yana’s post HERE.)
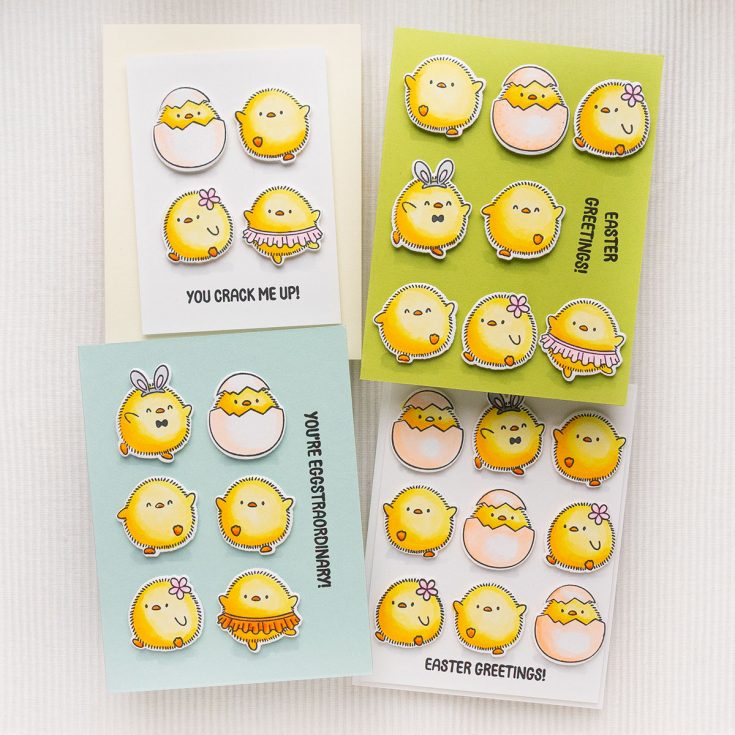
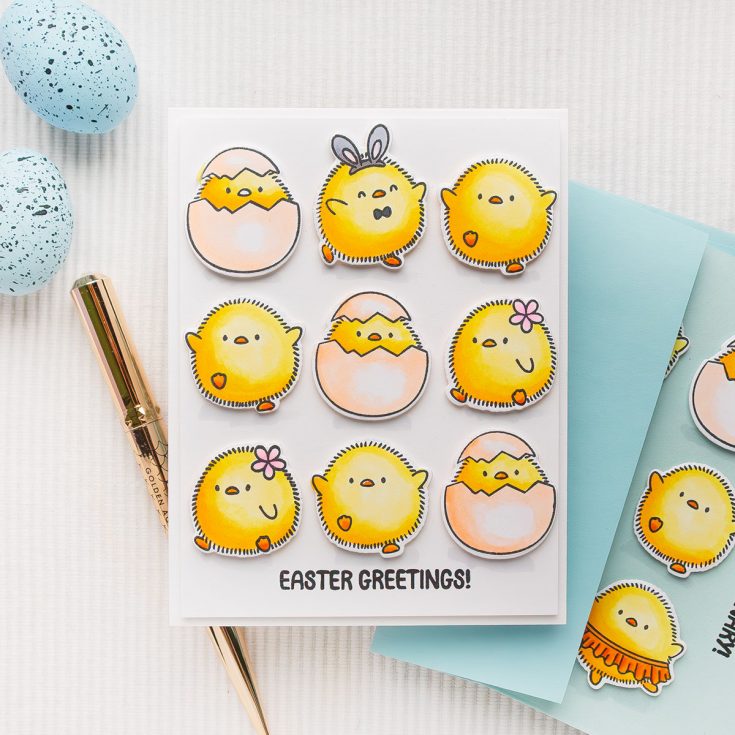
Hello, crafters, this is Yana Smakula for Simon Says Stamp! Welcome back for another Yippee For Yana video! Have you ever made a grid card? These are not only fun, but also easy to make. The key is start with a small image or a set of small images and repeat several times to create a grid and fill the background of your card.
Depending on the size of the image you are using and the size of the cards you are making, you can have a grid as small as 2×2 or as large as 3×4. I have 4 cards to share featuring various grids and images from the Eggstra Special stamp set by Simon Says Stamp.
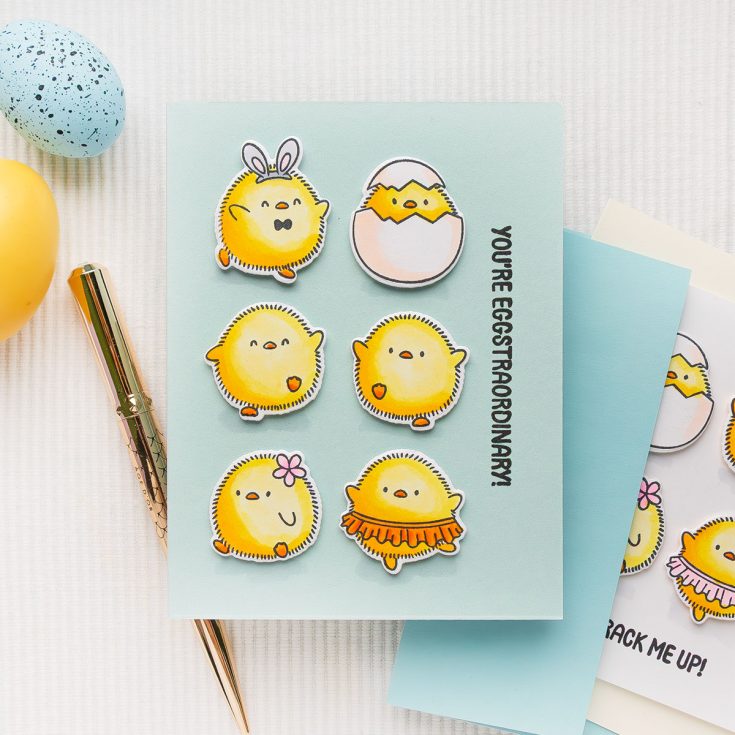
My first card showcases a 3×3 grid where one the grid blocks is replaced by a sentiment. I used a green card base here made from Simon’s Green Apple cardstock.
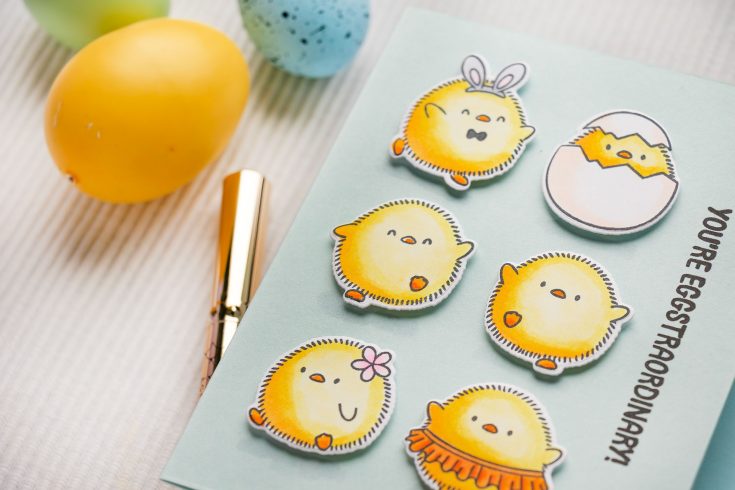
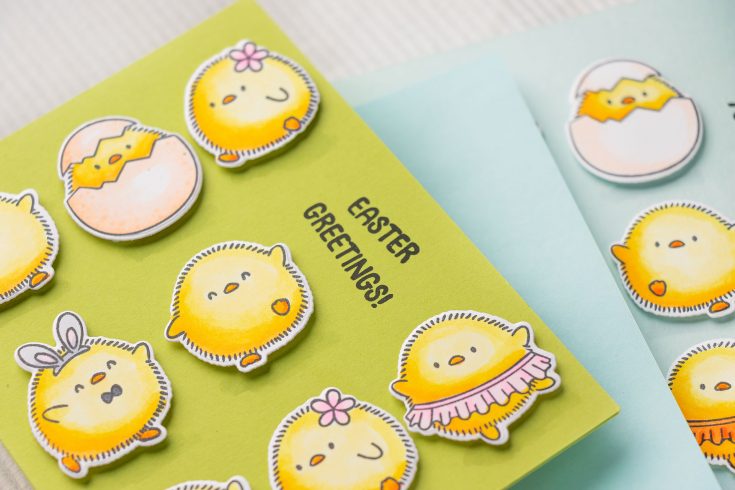
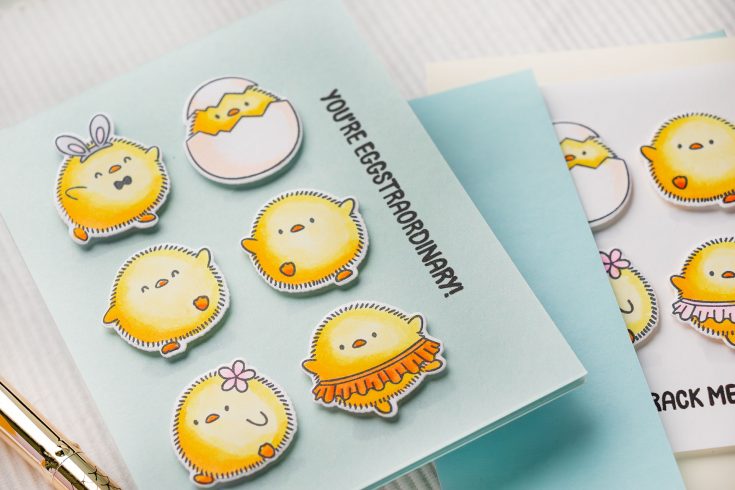
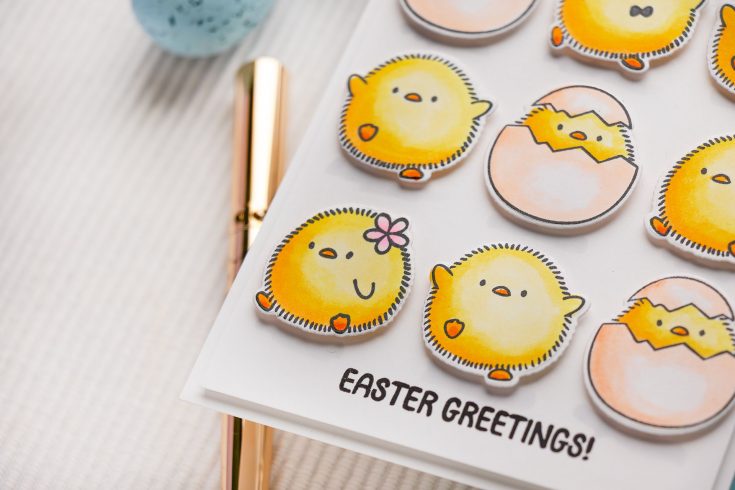
My 2nd card is a 2×3 grid. The sentiment is not part of the grid layout and is simply stamped off to the right, but vertically for some visual interest. The card base is Sea Glass, also from Simon, and it works so well with the yellow chicks!
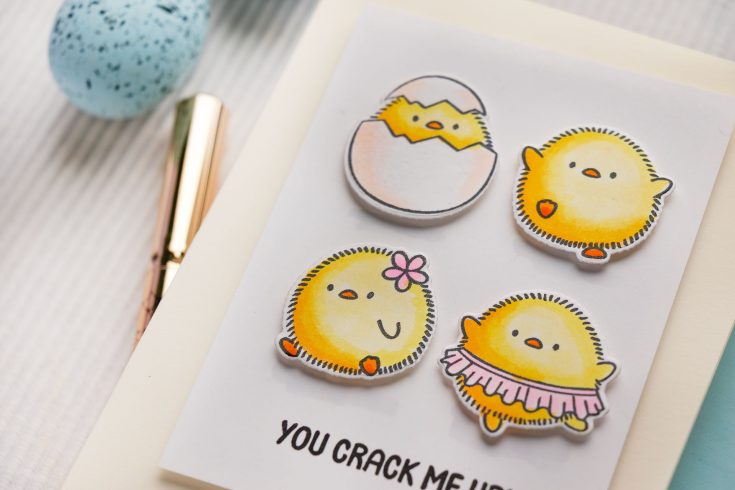
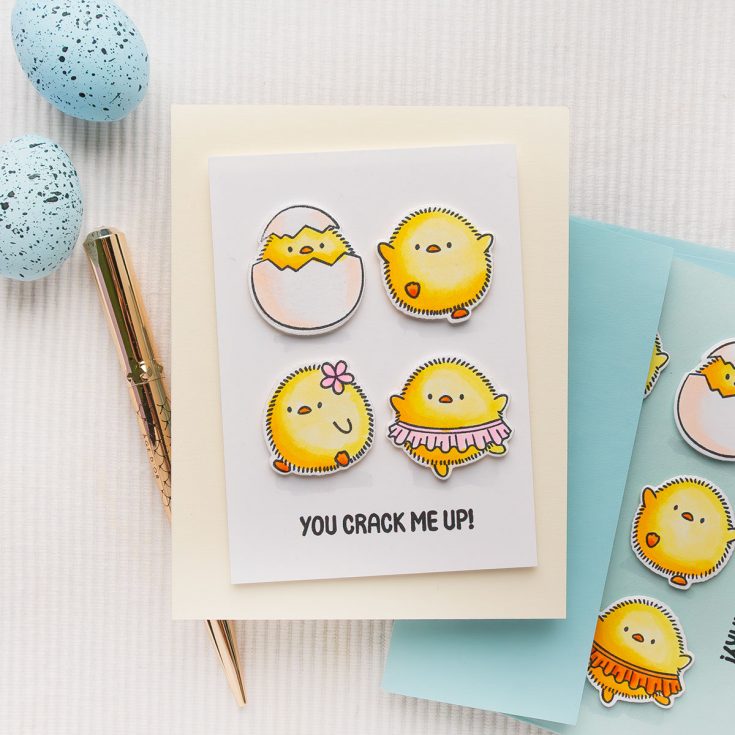
My 3rd card is a cute 2×2 grid. If you don’t have coordinating dies, this and card #4 would be great to try. The sentiment is added at the bottom of my grid. Since this is a smaller focal point, the grid was build on a 3 ½ x 4 ¾” panel which I foam mounted onto Buttercream card base.
Card #4 is a full 3×3 grid with a sentiment stamped below. This one has another panel added (4 x 5 ¼”) and foam mounted onto white A2 card base.
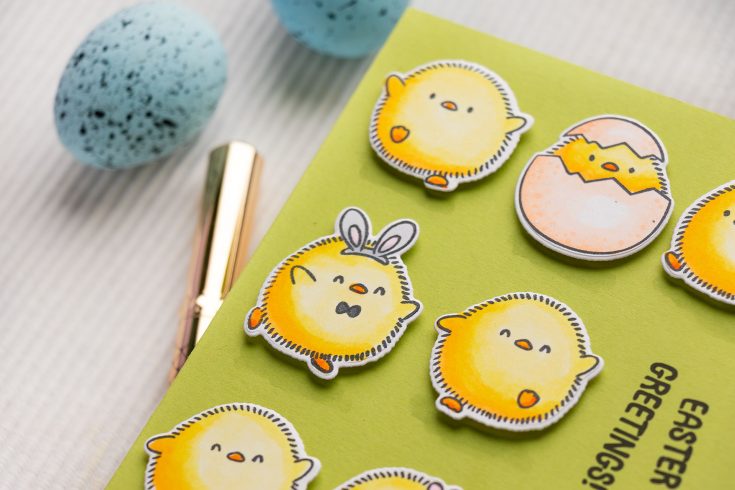
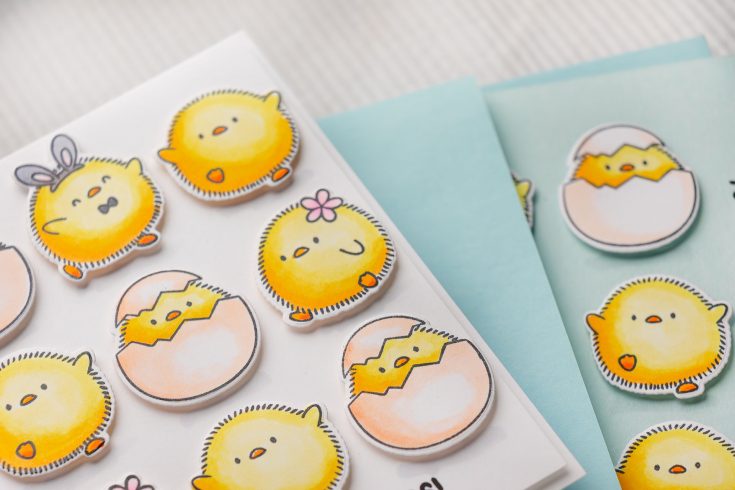
I didn’t add any embellishments to my cards as I didn’t feel they needed any, but I did add shading under each chich using a C1 Copic marker. Speaking of markers, all of these images were colored Copics, I used a limited color palette:
- Chicks: Y35, Y15, Y13, Y11
- Feet and beaks: YR04, Y17
- Flower and tutu: RV00, RV02
- Bunny ears: C3, C1, RV00
- Egg: YR0, E00, E000
Grid cards are always fun to make! I encourage you to search your stash (or pick up the Eggstra Special stamp set) and create a few grid cards of your own!

Have fun stamping!
WATCH THE VIDEO:

SUPPLIES:
|


Ways to support Ukraine:
If you are looking for ways to support Ukraine, we encourage you to visit this page on Yana’s blog:

Thanks so much for stopping by, and thanks to Yana for being our guest!
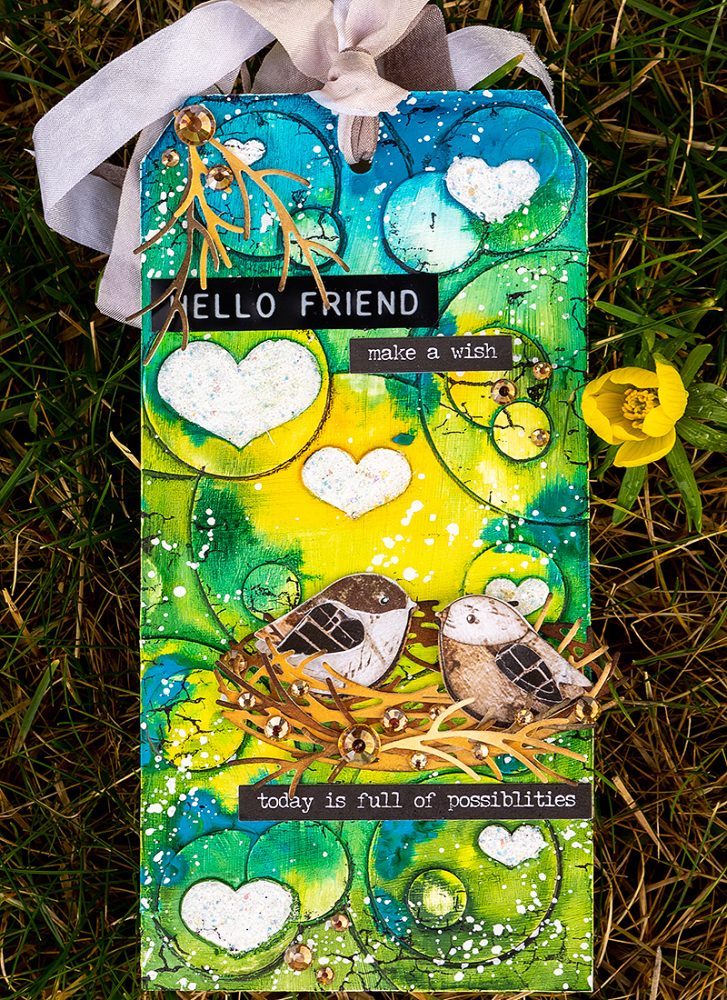
Today is Full of Possibilities! Mixed Media Bird Tag
Hi friends! Happy Sunday! I’m delighted to welcome back special guest Anna-Karin Evaldsson to our guest with this adorable mixed media tag perfect for being on the verge of Spring! Read on to learn all the details and enjoy!

Hi everyone! There is a hint of spring in the air and I am happy to be here today with a new tutorial. It’s a fun and easy mixed media technique where die cut images are embedded into the background. It is also a great way to get even more use of your dies. I made a tag, but the techniques work just as well for cardmaking and scrapbooking.
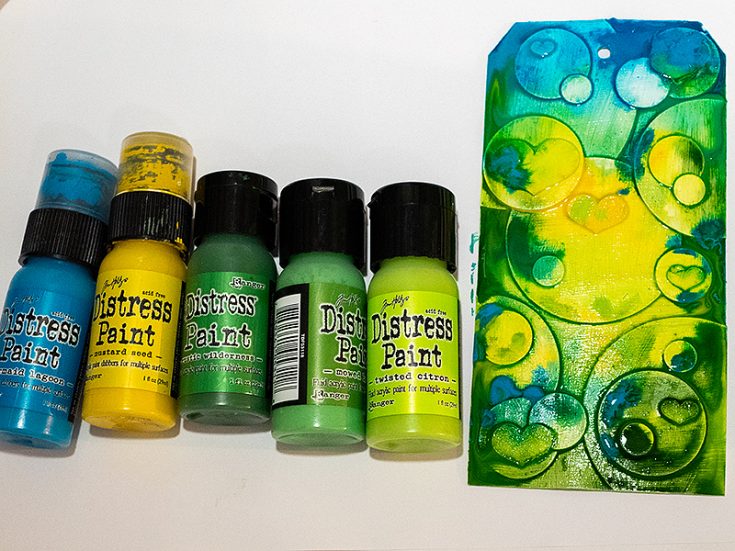
The Simon Says Stamp Basic Shapes Circles die set is so useful and versatile. It is from the brand-new Favorite Things release and contains 18 circle dies in different sizes, which is a whole lot of circles! Today, I used the set to create a layered circle pattern on my background. I also added glittery hearts with a stencil and two cute little birds.
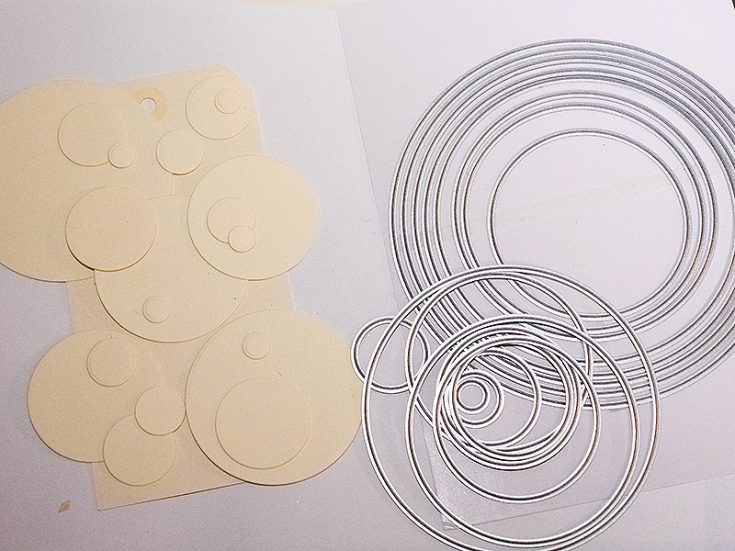
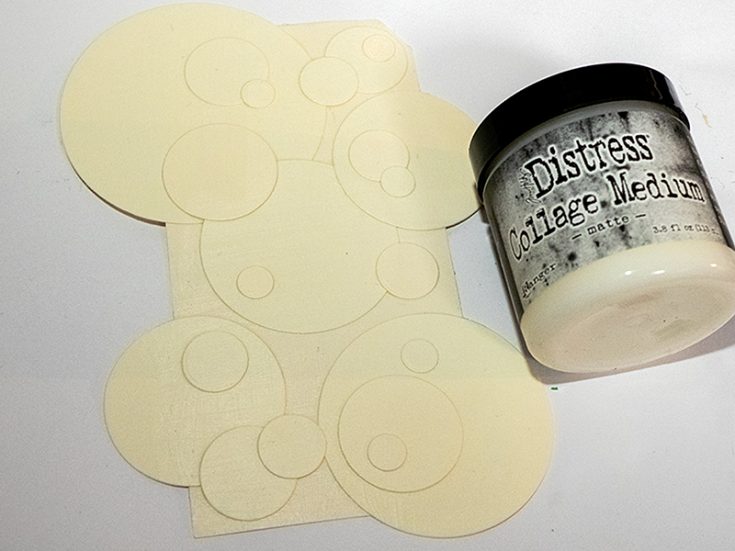

Start by die cutting circles in different sizes from Ranger’s Heavystock Cardstock. Layer them on a tag and move around until you are happy with the look. Snap a photo to help you remember where you placed the circles.
Glue the circles with Distress Matte Medium and add a layer of medium on top too.
Trim the edges.
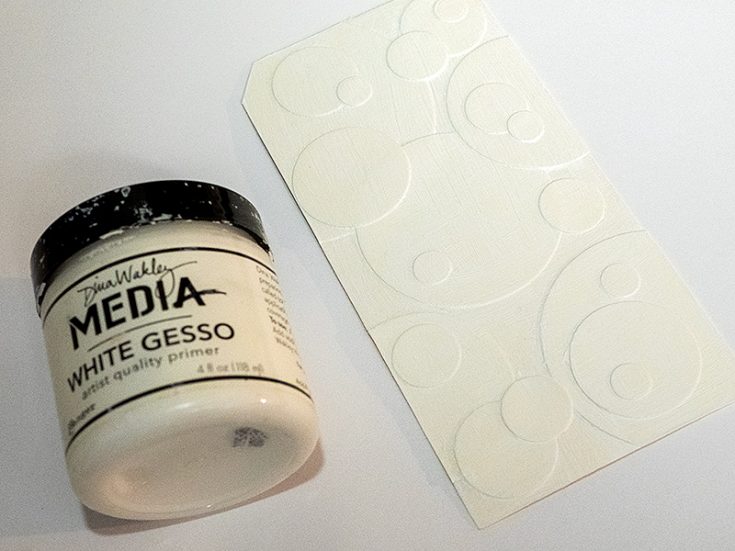
Coat the tag with gesso. Leave to dry.
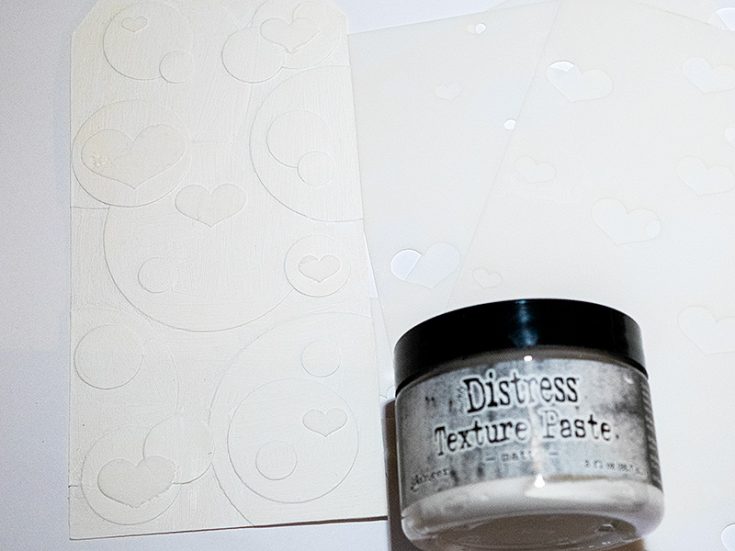

Use the Simon Says Stamp Outline Hearts stencil set to add hearts here and there on the tag. Apply Texture Paste with a palette knife through the stencil. The Outline Hearts set consists of four stencils and since they are meant to be used together, the hearts on each stencil are fairly far apart. This makes it much easier when you just want to use a heart here and there since you don’t need to mask off any areas.
Paint the tag with Distress Paint and mist with plenty of water so that the colors blend. Leave to dry.
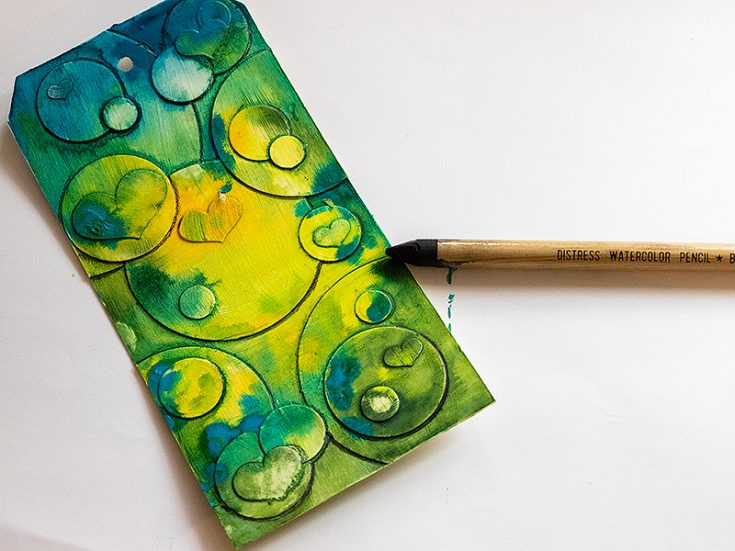
Use Tim Holtz Black Soot Watercolor Pencil to add shadows to the circles.
At this stage, I wanted more light elements on the tag and decided to paint the hearts white.
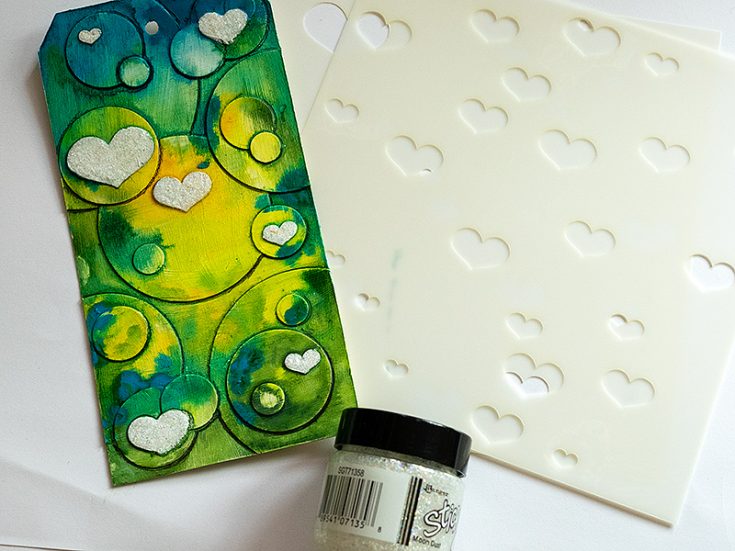

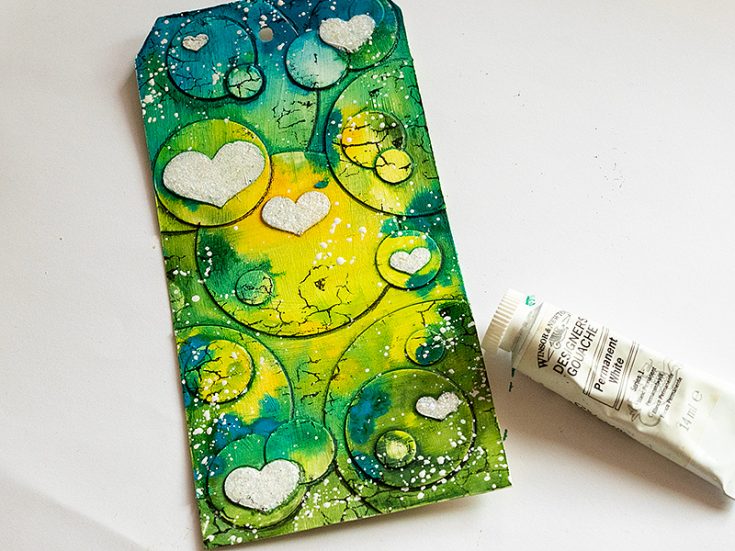
When the white paint was dry, I placed the stencil back and applied Moon Dust Stickles with a palette knife.
Stamp here and there with Simon Says Stamp Crackle Background and Jet Black Archival Ink.
Splatter the tag with Winsor & Newton Permanent White Gouache. Add a little water to the paint before splattering. Pick up with a paint brush and tap the brush to create splatters.
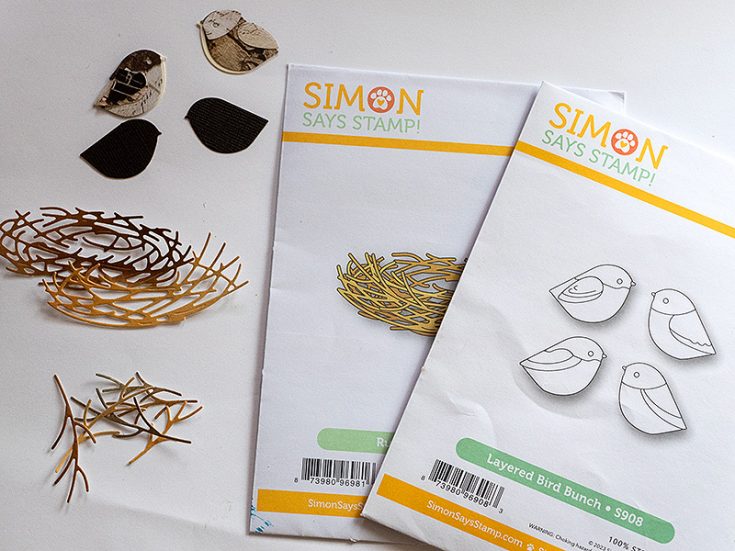

Die cut the Simon Says Stamp Layered Bird Bunch from Tim Holtz Halloween Backdrops paper. The backdrops papers have great textures for die cutting. Die cut Simon Says Stamp Rustic Nest from left-over inky paper, or use patterned paper.
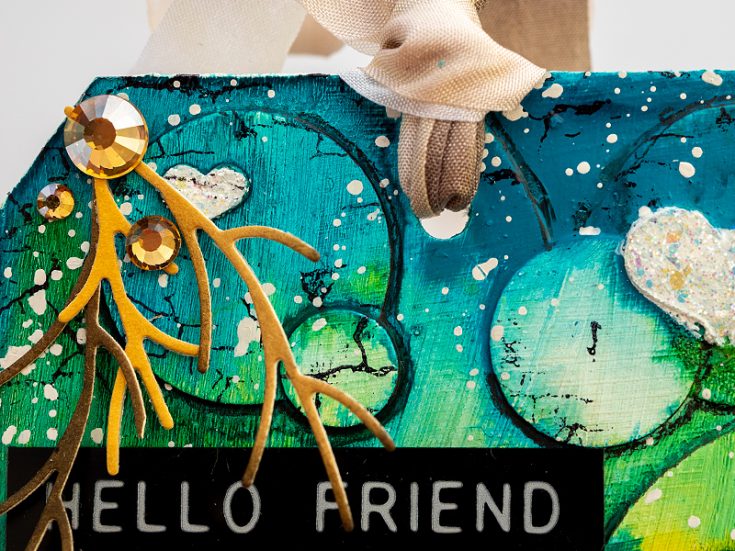
Die cut the bird once more from black cardstock to use as a base and assemble the birds. Shape the wings a little. Glue the nest and the birds on the tag and add Simon Says Stamp Pawsitively Dazzling Gold Gems.
I glued a few twigs at the top of the tag too. The tag was tied with May Arts White Wrinkled Faux Silk Ribbon which had been dyed with Distress Ink.
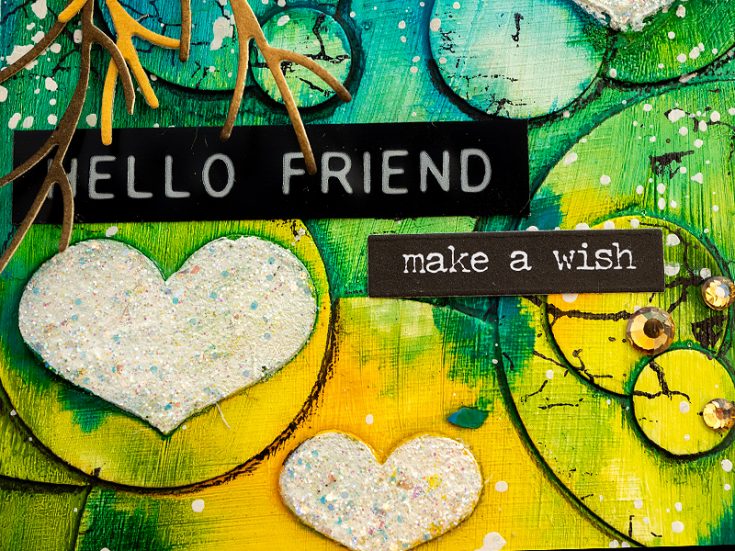
The white hearts are very glittery. I used sentiments from Tim Holtz Sentiments Label Stickers and Small Talk stickers.
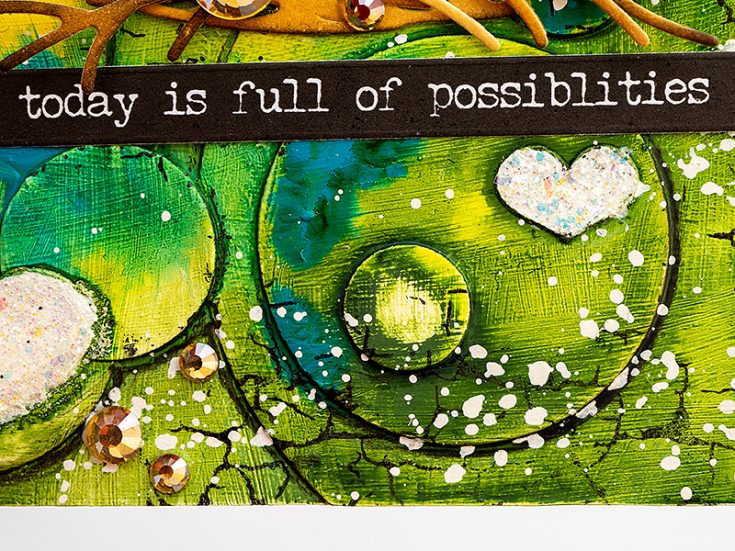
The texture of the brush marks is visible on the background.
Embedding die cuts in the background is a great way of getting even more out of your dies. There are so many possibilities. The background also becomes very sturdy. You can also try using patterned paper for the die cuts instead of cardstock. Thank you so much for looking! Happy crafting! –Anna-Karin
SUPPLIES:
|


Thanks so much for stopping by, and thanks to Anna-Karin for being our guest!


